CRISPY & CHEWY SESAME SHIITAKE

At Gratitude Garden Farm, we believe that great meals come from great ingredients, and our Crispy & Chewy Sesame Shiitake recipe is the perfect example. Shiitake mushrooms, with their rich umami flavor and satisfying texture, are transformed into a crispy, chewy treat that’s bursting with savory goodness. Coated in sesame seeds and gently fried to perfection, these mushrooms are the ideal balance of crunch and tenderness.

Whether served as a snack, appetizer, or over rice with your meal, these Sesame Shiitakes offer a unique and delicious way to enjoy one of nature’s finest ingredients.

INGREDIENTS:

For the shiitake:

For the sesame sauce:

For garnish:

  • 2 green onion , thinly sliced
  • 2-3 teaspoons sesame seeds

INSTRUCTIONS:

  1. Slice shiitakes into 1/2 inch pieces. Dry fry mushrooms in pan stirring until mushroom are cooked, about 6 mins.  Gently dab out the excess water from the mushrooms. Toss them in the cornstarch so they are evenly coated and shake off the excess. If you are having trouble getting the cornstarch to stick add some of the oil.
  2. Heat oil in a skillet over medium-high heat. Make sure the oil is nice and hot before adding in the mushrooms so that they fry, and not just soak up the oil. Fry the mushrooms until they are lightly golden on all sides, and no white cornstarch remains.
  3. In the meantime make the sauce by adding all of the ingredients to a small sauce pan. Cook the sauce for about 2 minutes until it begins to thicken. Add in the fried shiitakes and toss to coat. Serve immediately over rice or in anyway that you desire, and garnish with green onions and sesame seeds.

BAKED SHIITAKE MUSHROOMS

These mushrooms, known for their deep umami flavor and meaty texture, take on a rich, savory quality when baked to perfection. With minimal prep and just a few key ingredients, this recipe transforms Shiitake mushrooms into a tender, flavorful dish that’s perfect as a side, appetizer, or light meal.

Whether you’re a longtime fan of mushrooms or new to cooking with them, this easy baked version will quickly become a favorite.

INGREDIENTS:

  • 4 tablespoons extra-virgin olive oil or melted butter
  • 1 tablespoon white wine or white wine vinegar
  • 1 teaspoon sea salt
  • ¼ teaspoon black pepper
  • 1 teaspoon garlic powder
  • 1 teaspoon dried thyme
  • 1 lb. fresh shiitake mushrooms rinsed and dried; stems removed if you wish*
  • 2 tablespoons chopped parsley for garnish

INSTRUCTIONS:

  1. Preheat your oven to 400 degrees F. Line a large, rimmed baking sheet with high-heat-resistant parchment paper.
  2. In a large bowl, whisk together the olive oil, vinegar, kosher salt, black pepper, garlic powder, and dried thyme. 
  3. Add the mushrooms and toss to coat. 
  4. Transfer the coated mushrooms to the prepared baking sheet.
  5. Bake until tender, about 20-30 minutes. Garnish with chopped parsley and serve

NOTES

* Many shiitake recipes will advise you to remove the stems, which are edible but tend to be tough and fibrous. You can certainly do that if you wish. Personally, I find that the stems of small, young mushrooms are fine to eat. If you decide to remove them, cut them off with a knife – you won’t be able to twist them off as you can do with white mushrooms.

PIOPPINO MUSHROOM SALAD WITH PICKLED RED ONION AND SOFT BOILED EGG

At Gratitude Garden Farm, we love crafting recipes that celebrate the beauty of simple, fresh ingredients. This Pioppino Mushroom Salad with Pickled Red Onion and Soft-Boiled Egg is a perfect harmony of flavors and textures—earthy, nutty Pioppino mushrooms, tangy pickled onions, and a creamy, soft-boiled egg come together to create a dish that’s as nourishing as it is elegant.

Whether you’re looking for a light lunch, a refreshing side, or a stunning salad to impress guests, this recipe offers the perfect balance of protein, healthy fats, and vibrant farm-fresh produce. It’s a celebration of what the earth provides—grown with care and served with love.

Let’s get cooking!

Ingredients:             

  • 2 Cups Arugula or Watercress
  • 2 Cups Pioppino mushrooms
  • 4 Eggs, soft boiled 
  • 1-2 Tablespoons pickled red onions or chopped green onions, green portions only
  • Olive oil
  • Touch of your best wine vinegar
  • Salt and red pepper flakes

Instructions:

  1. Preheat your oven to 350 degrees
  2. Place mushrooms in a large bowl and drizzle a bit of olive oil over them.  Add a pinch of red pepper flakes.  Toss the mushrooms in the bowl until completely coated in the oil and then place on a baking sheet.
  3. Roast the mushrooms for around 20 minutes, then turn them and roast another 10 minutes or so.  Remove from the oven and allow to cool slightly, about 5 minutes.
  4. Place mushrooms in a bowl and add a pinch of salt and toss to coat.  Taste and adjust the seasoning level if necessary.  Add just a scant touch of vinegar to the mushrooms.  Toss again and set aside.
  5. Place a large pot of water on high heat and bring to a boil.  While waiting for the water to boil, prepare a water bath by taking a very large bowl and filling it with lots of ice and water.  Set aside.
  6. Plan on one egg per serving.  However, add a few extra eggs in case one breaks or does not turn out well.
  7. Once the water is boiling, using a slotted spoon, add the eggs one at a time being careful not to break them.  Once all the eggs are in, reduce the heat to medium low or low (the water should be bubbling but not at a full boil).  Cook the eggs for around 8 minutes (a minute less for smaller eggs and a minute or so more for extra-large eggs).
  8. Once the eggs have cooked, remove them promptly using the same slotted spoon.  Place each egg immediately in the water bath and keep them in the ice water for around 5 minutes or until completely cooled.  To help that along, gently tap each egg on the ends slightly cracking the shell.  Place the eggs back in the water to finish cooling.  Refrigerate the eggs once cooled until ready to serve.

To serve:

  1. Take the Arugula and a tablespoon or two of olive oil and place both in a large bowl.  Gently toss the watercress to coat.  Take a platter and place the Arugula and the mushrooms together and mix them together. 
  2. Add the pickled red onion or green onion tops if using and gently toss everything to combine. 
  3. Taste the salad and add a touch of salt and some red pepper flake if needed. 
  4. Cut each egg in half and arrange each on top of the salad. 
  5. Drizzle just a touch more olive oil and an even smaller touch of vinegar over the top of everything.


CREAMY MUSHROOM SOUP WITH SHIITAKE

The simplest ingredients can create the most nourishing meals. This Creamy Mushroom Soup with Shiitake is the ultimate blend of comfort and wellness—rich, velvety, and brimming with earthy flavor. Shiitake mushrooms, celebrated for their robust taste and immune-boosting properties, take center stage in this creamy soup, making it as nourishing as it is delicious.

Perfect for a chilly evening, a light lunch, or as an elegant starter for your next gathering, this recipe brings farm-to-table goodness straight to your kitchen. So grab your favorite spoon, and let’s create a bowl of warmth and health with fresh Shiitake mushrooms!

Ingredients

  • 10 oz shiitake mushrooms , large whole
  • 1 tablespoon olive oil
  • 1 tablespoon butter or plant based butter
  • 1 onion chopped
  • 1 carrot chopped
  • 1 teaspoon thyme
  • 1 teaspoon salt
  • ¼ teaspoon black pepper
  • 2.5 cups water
  • 1 can light coconut milk or half and half
  • 3 green onions chopped (OPTIONAL)

Instructions 

How to make creamy mushroom soup with shiitake

  1. Slice mushrooms into bite-sized pieces. Heat 1 tablespoon olive oil and 1 tablespoon butter in a large pan, add sliced mushrooms and cook for about 10 minutes until mushrooms soften. Remove half of cooked mushrooms to a separate plate.
  2. To the other half of mushrooms, remaining in a large pan, add chopped onion, carrots, thyme, 1 teaspoon salt, pepper to taste. Continue cooking vegetables for 10 more minutes, until onions and carrots soften a bit.
  3. Add 2.5 cups of water to vegetables (mushrooms, carrots, onions) in the pan, bring to boil and boil on medium heat for 20 minutes. Some liquid should visibly evaporate, leaving reduced stock, but don’t let all water evaporate. add more water if that’s the case.
  4. Remove from heat and add the stock you just made (water with mushrooms, carrots, onions) into the food processor. Process the mixture until it achieves puree consistency.
  5. Put puree back into the same cooking pan, add reserved cooked mushrooms that you removed to the plate earlier. Add the coconut milk Bring to boil, reduce heat to simmer (low heat) and cook covered for 5 minutes, constantly stirring. Add more salt and pepper if desired. Your soup is done at this point, or you can add chopped onions towards the end or use them as garnish, or skip them altogether (depends if you like green onions in your soup).

NOTE: You could use any type of mushroom for this dish, and it would be delicious!

Image taken from Foolproof Living

 PIOPPINO SLOPPY JOES

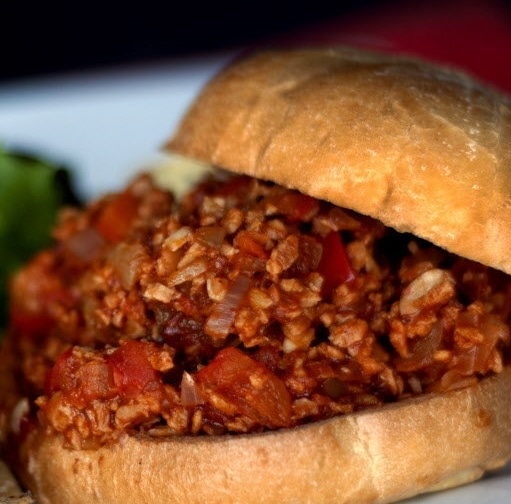
We’re always looking for ways to turn everyday meals into nourishing, flavorful experiences. These Pioppino Sloppy Joes are a perfect example—a fun twist on a classic comfort food with the rich, earthy flavor of Pioppino mushrooms taking center stage. Known for their meaty texture and delicate, nutty taste, these mushrooms are not only a delicious plant-based option but also packed with nutrients that your body will love.

Whether you’re craving a cozy family dinner, a satisfying meatless Monday recipe, or just a creative way to enjoy our farm-fresh mushrooms, this recipe will quickly become a household favorite. Let’s dive in and discover how Pioppino mushrooms can transform a nostalgic classic into a gourmet, feel-good meal!

INGREDIENTS (makes 2 burgers)

  • 1/2 pound Pioppino mushrooms finely chopped
  • 1 tablespoon olive oil
  • 1/2 medium onion, diced
  • 1/2 medium red bell pepper, stemmed, seeded and diced
  • 2 cloves garlic, minced
  • 1/2 15-ounce can no-salt-added tomato sauce
  • 1/2 tablespoon tomato paste
  • 1  tablespoons molasses
  • 1/2 tablespoon chili powder
  • 1 teaspoons apple cider vinegar
  • 1/2 teaspoon powdered mustard
  • 1/2 teaspoon kosher salt
  • 1/8 teaspoon freshly ground black pepper
  • 2  hamburger burger

DIRECTIONS

  1. Brown the mushrooms in a very large skillet over medium-high heat for about 5 mins with 1/2 the oil. 
  2. Add the remaining oil to the pan (medium-high heat); once the oil shimmers, stir in the onion and red bell pepper; cook for 5 or 6 minutes, stirring occasionally, until the onions have picked up a little color and the red bell pepper has softened. Stir in the garlic; cook for 6 minutes.
  3. Reduce the heat to medium. Stir in the tomato sauce, tomato paste, molasses, chili powder, vinegar, powdered mustard, salt and black pepper, until well blended. Cook for 5 to 10 minutes, until the mixture thickens and most of its liquid has evaporated.
  4. To serve, pile about 3/4 cup of the mixture onto each split hamburger bun. Serve warm.


CORNMEAL-CRUSTED OYSTER MUSHROOM PO’ BOYS

Get ready to bring a taste of New Orleans to your kitchen with this mouthwatering recipe for Cornmeal-Crusted Oyster Mushroom Po’ Boys! Perfectly crispy on the outside, tender on the inside, these plant-based po’ boys deliver all the satisfying crunch and bold flavors of the traditional sandwich—without the seafood.

Oyster mushrooms, with their delicate texture and savory bite, are the ideal stand-in for fried oysters. Coated in a spiced cornmeal crust and fried to golden perfection, they pair beautifully with the tangy crunch of coleslaw and creamy remoulade sauce, all tucked into a soft French roll.

Whether you’re looking for a new spin on comfort food or a crowd-pleasing dish for your next gathering, this recipe is guaranteed to impress. Let’s dive into this crispy, zesty, and utterly satisfying Southern classic, reimagined for plant-based food lovers!

INGREDIENTS:

For the Cajun Remoulade:

For Breading:

Other Ingredients:

 Preparation

1 : Make the remoulade. Combine the mayo, vinegar, relish, mustard and Cajun seasoning in a small bowl. Cover and place in the fridge until ready to use. Slice the tomato and set aside.

2: Make the breading. Mix together the panko, flour, cornmeal, paprika, kelp, garlic powder, onion powder, cayenne and celery salt in a shallow bowl. Mix the tamari, water and cornstarch together in a second shallow bowl.

3: Set a wire rack over a pan lined with paper towels.

4: Heat the oil in a medium frying pan over medium-high heat for about 2 minutes. When the oil is hot, the surface will look wavy or shimmering. Test that the oil is hot by dropping in a bit of flour or breadcrumbs. When it sizzles a lot, the oil is ready. While it heats, trim the oyster mushroom clusters into shrimp-size pieces.

5: The tamari slurry has a tendency to separate, so stir often to re-combine. Working a few at a time, dunk the mushrooms in the slurry, then coat them in the breading. Fry the mushrooms until crispy and golden brown, about 2 to 3 minutes per batch. Turn frequently. Fry them in 2 or 3 batches so you don’t overcrowd the pan.

6: Place the fried mushrooms on the cooling rack while you fry the rest. Slice the baguette into 2 or 3 pieces and toast them before you fry the last batch of mushrooms. Divide the fried mushrooms between the sandwiches and top with shredded cabbage, tomato, pickles and remoulade.

Recipe from One Green Planet

VEGAN CARNITAS WITH BLACK & WHITE KING OYSTER MUSHROOMS

Craving the bold, savory flavors of carnitas without the meat?

This vegan carnitas recipe featuring black and white king oyster mushrooms will blow you away! King oyster mushrooms, with their meaty texture and incredible ability to soak up marinades, make the perfect plant-based alternative for this Mexican classic.

Get ready to take your plant-based cooking to the next level. This recipe is quick, easy, and packed with all the authentic flavors you love.

Let’s dive in and create a dish that’s sure to be the star of your next meal!

INGREDIENTS

INSTRUCTIONS

  1. Pre-heat oven to 400 degrees F.  Wipe your mushrooms with a damp towel to remove any dirt.  Cut about 1/2 inch off the bottoms of the mushrooms and discard.  Cut the tops off the mushroom and thinly slice them.  Use two forks to shred the mushrooms stems into thin pieces.  I like to start with the forks and them use my fingers to pull them apart.
  2. Heat a large skillet over medium heat and add olive oil, shredded mushrooms, onion, garlic and tamari.  Cook until mushrooms and onions have softened, about 5 minutes.
  3. Next, add the orange juice, lime juice and all the spices.  Mix until everything is combined and cook until sauce has thickened, 5-7 minutes.
  4. Once sauce has thickened and coats all of the mushrooms, place the mushrooms on a large sheet pan and spread out so they’re all in one layer.  Bake mushrooms until nice and crispy, 15-10 minutes, flipping once.
  5. Use carnitas in tacos, burritos, nachos and more!  To assemble the tacos you see in this post, warm corn tortillas on the stovetop, spread with guacamole, add carnitas and top with onion, cilantro, jalapeño and cabbage.

NOTES

***This recipe makes about 4 tacos, BUT it can easily be doubled or tripled to make more

Recipe from She likes Food


OYSTER MUSHROOM BACON

Who says bacon has to come from a pig? If you’re looking for a smoky, savory, and satisfyingly crispy alternative, oyster mushroom bacon is about to be your new obsession!

Perfect for those who are living a plant-based lifestyle or simply looking to add variety to their meals, this recipe transforms humble oyster mushrooms into a flavor-packed treat.

Oyster mushrooms have a naturally meaty texture and ability to soak up marinades, making them the ideal base for recreating some delicious bacon. A blend of smoky seasonings, a touch of sweetness, and a crispy finish make this dish a versatile addition to your favorite meals. Crumble it over salads, layer it in a BLT, or snack on it straight out of the pan—we won’t judge!

Let’s dive into the kitchen and whip up some plant-based magic…

INGREDIENTS

INSTRUCTIONS

  • Heat a seasoned cast iron skillet over low heat and let warm up while prepping your ingredients.
  • Prep marinade by whisking together all ingredients. Prep Oyster mushrooms by cutting away any tough substrate and then tearing into strips. Be sure not to leave any stems too thick for the best results.
  • Place mushrooms into a single layer on the skillet and apply a weight to the top (like a panini press or another pan). Dry fry on low heat for 3-4 minutes.
  • Remove weight, flip mushrooms and reapply weight. Cook another 2 minutes.
  • Remove weight and brush mushrooms with marinade, flip mushrooms and brush other side with marinade. Cook 2 minutes.
  • Flip one last time, cooking another 1-2 minutes to desired level of crispiness. Lightly brush with marinade and sprinkle with salt to taste. Enjoy hot or cold!
  • Important Note: Do not overcrowd your pan or skillet. If you need to cook the mushrooms in batches, carefully clean off skillet between batches to prevent burning.

Recipe from Sam Cooks Kindness

VEGAN BBQ OYSTER MUSHROOM STEAKS

Who says you need meat to enjoy a flavorful, juicy steak?

With the incredibly meaty flavor of oyster mushrooms, you can create a vegan BBQ “steak” that’s smoky, tender, and bursting with mouthwatering flavor. This recipe is perfect for summer BBQs, weeknight dinners, or even as a hearty addition to your holiday spread.

Oyster mushrooms have a unique meaty texture that soaks up marinades beautifully, making them the ideal star for this vegan BBQ dish. Paired with your favorite BBQ sauce and grilled or pan-seared to perfection, these mushroom steaks are sure to impress both vegans and meat lovers alike.

Ready to elevate your vegan BBQ game? Let’s dive into the recipe and turn oyster mushrooms into the most satisfying “steak” you’ve ever tasted!

Ingredients

  • 2 Clusters Oyster Mushrooms
  • 100g Primal Kitchen BBQ Sauce
  • ½ c beer
  • 1 spring onion, finely sliced
  • Granulated garlic
  • BBQ blend seasoning 
  • Cracked black pepper
  • Salt, flakes
  • Organic High Oleic Sunflower oil

Instructions

  1. Preheat oven 200c (fan) / 375f convection or 400f bake.
  2. Trim the ‘hay’/stem from the bottom of the mushroom, keeping it all intact in one piece.
  3. Get cast-iron pan rippin’ hot and heat up 2 tbsp oil and swirl to evenly coat. Place mushrooms stem side down, into the pan on the outer edge hot spots.
  4. Press mushrooms with another cast-iron pan/heavy pot. Apply a little pressure until you hear the sizzle. Lift top pan, wipe off the liquid with a towel, set to the side. Mushrooms will be releasing liquid, leave the water to evaporate for a couple of minutes.
  5. Add beer to BBQ sauce in a bowl. Season mushrooms with BBQ blend seasoning, black pepper, granulated garlic, salt, and a 1 ½ tbsp oil. Flip mushrooms carefully with tongs.
  6. Repeat the pressing step again and leave to cook for a few more minutes. Season mushrooms again with bbq seasoning, granulated garlic, black pepper, and salt.
  7. Add a little oil around the edge of the pan and swirl, to prevent sticking, then flip mushrooms carefully again. Turn mushrooms again until charred and crispy on both sides, then place gently into the bowl of BBQ sauce, push down with hands until mushrooms are completely coated.
  8. Place saucy mushrooms onto a parchment-lined baking sheet and add a little more BBQ sauce to the top of each mushroom.
  9. Cook in the oven for 10-15 minutes. Remove and serve on a chopping board, garnish with green onion.

Recipe from The Wicked Kitchen 

For a video demonstration, we love this one below by Derek Sarno!

https://www.youtube.com/watch?v=v-5ABYcopAE&ab_channel=DerekSarno

OYSTER MUSHROOM RISOTTO

There’s something undeniably comforting about a bowl of risotto — warm, creamy, and packed with rich flavors, especially from those mushrooms. When paired with the earthy, umami-packed goodness of oyster mushrooms, this classic Italian dish transforms into an irresistible treat that’s perfect for any occasion.

This dish is surprisingly simple to make with a little patience and the right technique. In this recipe, we’ll walk you through step-by-step instructions on how to make a perfectly creamy risotto that highlights the delicate, meaty texture of oyster mushrooms.

Let’s get cooking!


Ingredients

Instructions

  1. Start by heating the chicken stock in a saucepan. Once it starts to simmer, turn the heat down to low and keep warm.
  2. Then on a medium heat, using the large saucepan, add 2 tablespoons of olive oil and the diced onion.
  3. Gently cook the onion for a few minutes until it starts to turn translucent.
  4. Then add half the minced garlic and the Arborio rice to the saucepan and stir to coat the rice with the onion and oil.
  5. Cook for 2-3 minutes before adding the white wine.
  6. Stir through the wine, allowing it to evaporate before adding a ladle or two of the chicken stock to the rice.
  7. Once the stock has nearly evaporated, continue to add another ladle of stock, stirring gently to cook evenly and so the bottom doesn’t stick.
  8. Continue this process until the rice has softened and cooked to al dente perfection. You can check this by squishing a grain of the cooked rice on the kitchen bench with the back of a spoon – if there is evidence of very fine white particles in the center of the gain – which is the uncooked part of the rice, then you’ve cooked it perfectly. Also taste test the risotto to ensure there are no hard pieces of rice. The additional hot boiled water is available to ladle extra liquid if required beyond the chicken stock. I find I need an extra ladle or two to ensure a creamy mushroom risotto.
  9. While the risotto is cooking, on a medium heat, add the remaining olive oil to the frying pan.
  10. Then add the remaining minced garlic to the pan and cook for 30 seconds.
  11. Add the oyster mushrooms to the pan to gently cook until the mushrooms have softened and cooked through.
  12. The final step is to add the cooked mushrooms, grated Parmesan cheese, chopped parsley and salt and pepper to taste to the risotto rice. Stir gently to combine and then serve.

This dish can be served as is or garnished with additional parmesan cheese and parsley.

Recipe from Plant Food At Home